|
|
|

Painting Beaded Flowersby Suzanne SteffensonPrinted with Permission
Several years ago I saw pictures of Mario Rivoli's beaded flowers. Indeed, his coloration is usually paired with exquisite and fanciful design, so much so, it is hard to pinpoint why his flowers are so distinctive. I was told he applies color to his flowers using a paint sprayer. I was fascinated with this approach and wanted to try it for myself, but did not have the means to experiment with a fine-mist sprayer. A few years ago glass paint was available, but it was so thick the flowers I painted looked as if they had been dipped in yogurt. I recently experimented with Jacquard Piñata alcohol-based glass paints, Pebeo Vitria water-based glass paints and Martha Stewart Crafts glass paints on beaded flower components. The glass paints I've used are not meant for beads. They were meant to supply bright splashes of color on relatively large surfaces – sometimes in a contrasting finish – like frosted or matte. Glass paints are easy to apply and the effects range from really awful to magical. By awful, I mean the original bead finish and color is obscured by paint, like a congealed coating. By magical, I liken the subtle blending of colors and shading to a water color effect. When you paint beads, you may prefer, as I do, to color but not change the character of the beads. I prefer beads with a clear, light-colored, or AB finish as a "canvas" for glass painting. I've also had good results with clear silver-lined 18/0s. If you apply paint with a light touch, the bead finish shows through. I've also found less is more when you are painting flower components. In other words, two colors blending into each other on an AB finish is fool-proof with its subtle shading and iridescence. Likewise, a two or three color speckled finish applied to the partial surface of an opaque bead, using a very small brush (one with few bristles), is also fun. Be brave. Usually I paint the components, like leaves and petals, before assembling them, although for the smaller flowers (with 16/0s and 18/0s), it has proven easier to assemble the flower and then apply the paint. I do not paint individual beads and then assemble them. I usually paint the components before I shape them to better control the application. I use simple and inexpensive tools and materials when painting – toothpicks, paper towels, lint-free and lightweight blotting materials like tiny sponge applicators (used for makeup), and very small and flexible paint brushes. Because the glass paints dry fairly quickly, have the pen or brush in one hand and blotting material in the other. I do not recommend cotton balls or any material likely to leave fibers on your components. Paint on a white surface, like a paper towel, to better judge the amount of color you have applied. Remember you can apply paint to the front and back of the beaded flower component. It is unlikely the color application will be consistent as it would be if you were using different colored beads. And your beads will spin on the wire, so consider that as you apply paint. And hedge your bets. I usually make extra leaves or petals so I can select the best of the bunch when constructing the flower. I'm hoping others will try painting beaded flower components, share their results, and broaden the possibilities for others. I've found painting is no substitute for the traditional forms of using various colors and finishes of beads to shade a beaded flower component – painting is simply different, not better.
Jacquard Piñata Glass PaintsThese alcohol-based glass paints are translucent, which is my preference when painting beaded flower components. The paints dry quickly – almost on contact – so you need to move quickly when applying and blotting color. The Piñata paints are the most affordable in an "exciter" pack containing seven colors, clean up solution, and extender. The extender acts like a thinner in that it keeps the color from drying up in the paint dish, and allows you to mix colors. You need extender to manage the application process and the specialized clean up solution to properly clean brushes. These colors are cured over time and become water, but not alcohol, resistant. 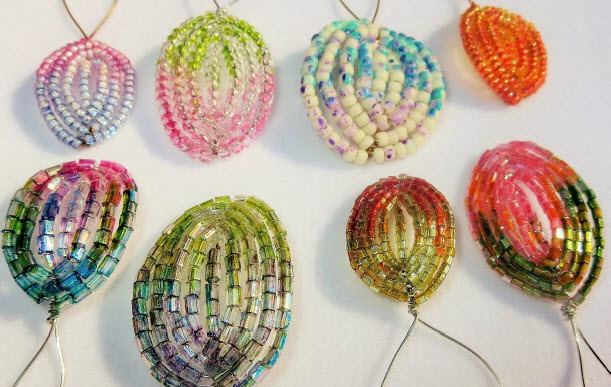
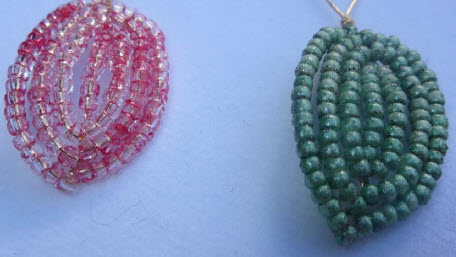
Original bead finish painted with Pebeo Vitrial colors: Top left to right: Opal white, clear, opaque white matte, clear yellow Bottom left to right: Clear AB, clear AB, chartreuse/silver, opaque gloss pink Pebeo Vitria Glass PaintsVitria paints come in marker-like pens or in bottles and in frosted and shiny finishes – not translucent. I usually thin the color, and then paint and blot to reveal the bead finish. Directions specify to bake the painted item in an oven* to set the color. If you bake the items, the finish will be frosted (matte) or shiny as specified on the pen or bottle. If you do not bake the components, they will remain shiny. Pebeo said you do not have to bake the items in order for the color to set, as they intended the product for glassware, which would go in a dishwasher. Be advised that if you decide to bake your wire beaded components to cure them, the components should be shaped before they are baked. Baking seems to thicken the paint and stiffen the component – or cause beads to stick together. Shaping after a component is baked may result in broken beads. Baking may also have an adverse effect on wire. I baked some components, did not like the result, so air cure instead. If you are using the Pebeo bottled paints, I highly recommend you buy Vitrea thinner. Although the bottle paint is not as thick as the Martha Stewart paints, the paint was designed to provide opaque color on large surfaces. Thinner will allow you to thin the paint for a cleaner application and make it easier to mix colors. Thicker paint results more often in a mottled effect, where paint is concentrated in between beads. The pens are preferred by some for their control, but the pens seem to dry out easily. You have to shake them, and I use paper towels to blot before I begin applying color to the component. I do this to better assess the amount of paint/pressure to apply to the beads. Clean brushes with soap and water. Martha Stewart PaintsI've experimented with Martha Stewart Crafts glass-specific paint in a variety of finishes – opaque, frost translucent, gloss transparent, pearl opaque, and fine glitter transparent – but I do not believe the glass-specific paints are still being sold. Unfortunately, I really liked the translucent glass paint that contained fine glitter. It is a subtle effect, but quite unique, and something the other brands do not offer. There is now an acrylic water-based version for glass and other surfaces, and I have not experimented much with it. The acrylic paint I did use, compared to the Jacquard paints, dulled the AB finish of the beads. All the finishes '’ve used are thick and require a small brush application. The opaque finish has expected results – it goes on thick, with a congealed effect. You have to blot immediately, which may outline some beads in paint, as shown above, or cause them to stick together. You get better effects with the translucent colors. The Martha Stewart Crafts glass paint bottle labels do not have instructions on thinning them or mixing them. Not being able to thin the paints makes it harder to control the application. I applied the paints with a small brush and blotted – my strategy for applying all the glass paints with the exception of Pebeo paint pens. Blotting picks up the glitter, so it is fine balance between ensuring you have a clean application and retaining glitter. You air cure the components for 21 days to set the color. Clean brushes with soap and water. Cleaning Painted FlowersDepending on the paint you use, and if the painted item has been cured according to the manufacturer's instructions, cleaning the painted flower is probably at your own risk. The glass paints I 've used were meant to be used on dishware, so they should probably withstand a mild detergent and water cleaning. Windex, on the other hand, may not be a good bet for flowers painted with alcohol based paints. I've yet to wash my painted flowers, so when I do, I'll update this article accordingly. Painting with ColorMagic Mario Rivoli Flower * Editor's Note on Safety: Do not bake paints in your kitchen oven. Use good venilation (a respirator is recommended) and gloves when working with these paints. |
|
©2014 Caren Cohen. caren@fuse.net |